Free Download DH11/DHT22 Temp and humidity sensor interface PIC16F877A MCU
Published: 4/2025
MP4 | Video: h264, 1280x720 | Audio: AAC, 44.1 KHz, 2 Ch
Language: English | Duration: 3h 28m | Size: 2.24 GB
Temp and humidity measurement sensors DHT11/DHT22 interface PIC16F877A microcontroller using MikroC for PIC software.
What you'll learn
How to interface DHT11/DHT22 sensors with a PIC16F877A microcontroller.
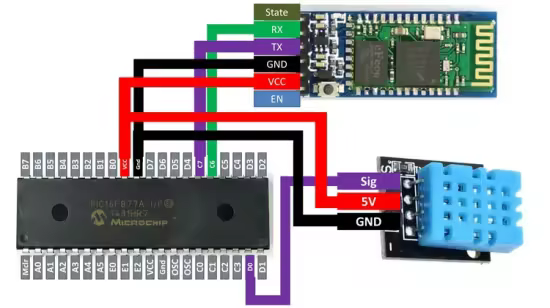
You will learn how to wire up DHT11/DHT22 with PIC16F877A microcontroller.
You will learn how to program DHT11/DHT22 sensor using MikroC for PIC compiler for PIC16F877A microcontroller.
You will learn how to make a useful project using PIC16F877A and DHT11/DHT22 sensor by sending/displaying output on various platforms.
Requirements
Beginners are welcomed.
Description
Hello Guys, Welcome to learning microcontrollers.This course has the following outline:Introduction to PIC16F877A microcontroller.Lecture 1: Introduction to PIC16F877A.Lecture 2: Setting up a PIC16F877A.Lecture 3: Going through datasheet of PIC16F877A.Lecture 4: Pins and Ports of PIC16F877A.Downloading and installing MikroC for PIC and PICKIT 3 programmer tool.Lecture 5: Download and install MikroC for PIC.Lecture 6: Download and install PICKIT 3 programmer tool. (Setup is in downloadables)DHT11/DHT22 sensor interface PIC16F877A microcontroller.Lecture 7: DHT11 vs DHT22 temperature and humidity sensor.Lecture 8: DHT11 temperature & humidity sensor send data to cell phone using HC-05 module.Lecture 9: PIC16F877A interface DHT11 temp and humidity sensor. Output on 16x2 LM016 LCD.Lecture 10: DHT11 temp and humidity sensor. Output on PC using USB to TTL device.Lecture 11: PIC16F877A interface DHT22 temp and humidity sensor. Output on 16 x 2 Lm016 LCD.Lecture 12: DHT22 temp and humidity sensor. Send data to PC/Laptop using USB to TTL device.Lecture 13: DHT22 temperature and humidity sensor. Output on smartphone using HC05 module.Here Section 1 and 2 are to get you started with the PIC16F877A microcontroller and its programming tools. Then section 3 is where you go through the core concept of this course. The lecture 8 is the main lecture which gives you a detailed understanding of how you can use a single wire interface of dht series of sensor to extract your required data. And then process that data using PIC16F877A to display or send it to output device.Great thing is that all PIC series MCU supported by MikroC for PIC have exactly the same syntax. So code for one can easily be modified for the other by simply changing the clock and the pin layout setting.
Who this course is for
Electronic students, electronic hobbyist and anyone with an interest of making projects using DHT11/DHT22 modules and microcontrollers.
Homepage:
Code:
Bitte
Anmelden
oder
Registrieren
um Code Inhalt zu sehen!
Recommend Download Link Hight Speed | Please Say Thanks Keep Topic Live
Code:
Bitte
Anmelden
oder
Registrieren
um Code Inhalt zu sehen!